
vSphere DSC - Part 2
Introduction
This is Part 2 of a series of posts on vSphere DSC. If you have not read it go back and read vSphere DSC - Part 1.
We now have vSphere DSC installed and the pre-requisites such as PowerCLI. We can now get to the good stuff.
Structure of the the Configuration
The main DSC construct is a Configuration. This is a code block which defines a few things:
- A keyword
Configurationfollowed by the name of the configuration - A Node block which defines the servers we want to configure
- The DSC Resource you are using
- The properties you are configuring (in key value pairs)
An empty configuration could look as so:
Configuration ConfigName {

    Node ServerName
    {
        File ResourceName
        {
            Type = File
            ...
        }
    }
}
What initially threw me when using vSphere DSC was the part about defining the server you want to configure (above is Node ServerName). Usually you put the server name such as DC1.corp.contoso.com so I was putting in esxi1.corp.contoso.com but vSphere DSC is different.
You always define the node as localhost. This is simply due to the fact the DSC module is using PowerCLI that is installed on your machine to make the changes on the remote vCenter/ESXi host. So you are always actually pointing at the machine you are running the Configuration on to make the changes.
Authentication
Now in the lab I don’t want to have to deal with certificates and more complex methods of authentication, so I am happy with using passing and storing plain text passwords. Obviously do not do this in the real world!
So to do simple authentication with ESXi or vCenter I am using DSC Configuration Data. This is a bit more advanced DSC topic, but it’s the only way I could get it to work with the vSphere Resources.
In the Configuration Data block I need to define:
- A
NodeNameoflocalhost - The keyword
PSDscAllowPlainTextPasswordthat allows plain text passwords - If using AD credentials the keyword
PSDscAllowDomainUserthat allows domain accounts for authentication
A good write up of 2. and 3. can be found on this blog post Using Credentials with PsDscAllowPlainTextPassword and PsDscAllowDomainUser in PowerShell DSC Configuration Data.
ESXi Host Examples
The vSphere DSC module can target both ESXi hosts and vCenter. Lets look at some examples and I find that is the easiest way to figure things out.
Now a simple example that is vital to correct infrastructure - NTP. We can use the resource VMHostNtpSettings to control NTP on an ESXi host.
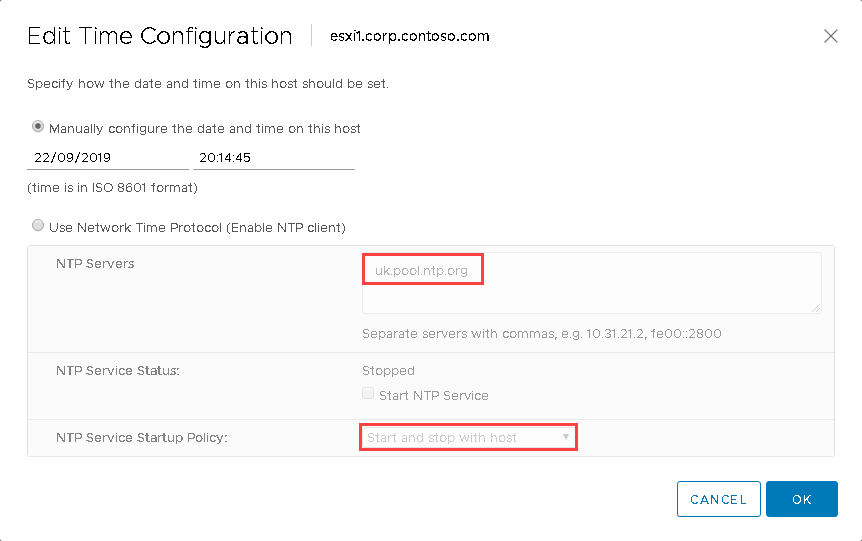
Here is my example which sets the NTP server to uk.pool.ntp.org and the Startup Policy to Start and stop with host. Currently the setup is:

The code to do this is:
$configurationData = @{
    AllNodes = @(
        @{
            NodeName = 'localhost'
            PSDscAllowPlainTextPassword = $true
            PSDscAllowDomainUser = $true
        }
    )
}

Configuration ESXiNTP {
    Import-DscResource -ModuleName VMware.vSphereDSC

    $Credential = Import-Clixml C:\Credential\root.cred

    Node localhost {
            VMHostNtpSettings ESXiNtpSettings {
            Server = 'esxi1.corp.contoso.com'
            Name = 'esxi1.corp.contoso.com'
            Credential = $Credential
            NtpServer = @("uk.pool.ntp.org")
            NtpServicePolicy = "On"
        }
    }
}

ESXiNTP -ConfigurationData $configurationData
First of all we need to create the Configuration Data hashtable. This sets up the plain text authentication.
Next we are importing the ESXi root credential into the $credential variable. I blogged about this method of storing credentials in the post Saving PowerCLI Credentials
Onto the Configuration itself. We are creating a configuration called ESXiNTP. We need to import the vSphere DSC module first of all. Next we are defining the Node of localhost as we are actually running it via PowerCLI on the machine being used.
Now the resource. We are creating a resource called ESXiNtpSettings with the VMHostNtpSettings resource. We now need to connect to the actual ESXi host that we want to change. This is done with the Server, Name and Credential key value pairs. This is one of the strange things I found with the resource. If we were authenticating to a vCenter we would define the vCenter in Server and the actual ESXi host in Name. As we are dealing with an ESXi host directly in this example we put the hostname in both Server and Name instead of just defining Name and omitting Server. This is the same for any of the resources that can target an ESXi host directly.
Now onto the actual changes we are making. I am setting the NtpServer to uk.pool.ntp.org and the service startup type to On. On is actually Start and stop with host.
Finally the last line runs the Configuration and passes the Configuration Data to build the necessary MOF file. A MOF file is a Managed Object Format file which is used to describe CIM classes for making the changes. In this case the MOF file generated looks as so:
/*
@TargetNode='localhost'
@GeneratedBy=a-cwestwater
@GenerationDate=09/22/2019 19:45:02
@GenerationHost=IT1
*/

instance of MSFT_Credential as $MSFT_Credential1ref
{
Password = "VMware1!";
 UserName = "root";

};

instance of VMHostNtpSettings as $VMHostNtpSettings1ref
{
ResourceID = "[VMHostNtpSettings]ESXiNtpSettings";
 Name = "esxi1.corp.contoso.com";
 NtpServicePolicy = "On";
 Server = "esxi1.corp.contoso.com";
 SourceInfo = "C:\\Scripts\\vSphereDSC\\ESXiNTP.ps1::18::13::VMHostNtpSettings";
 NtpServer = {
    "uk.pool.ntp.org"
};
 ModuleName = "VMware.vSphereDSC";
 Credential = $MSFT_Credential1ref;
 ModuleVersion = "2.0.0.0";

 ConfigurationName = "ESXiNTP";

};
instance of OMI_ConfigurationDocument


                    {
 Version="2.0.0";


                        MinimumCompatibleVersion = "1.0.0";


                        CompatibleVersionAdditionalProperties= {"Omi_BaseResource:ConfigurationName"};


                        Author="a-cwestwater";


                        GenerationDate="09/22/2019 19:45:02";


                        GenerationHost="IT1";


                        Name="ESXiNTP";


                    };
Note in this MOF file the UserName and Password in plain text. Don’t do this in Production!
To generate the MOF file in a PowerShell prompt run the saved Configuration:
PS C:\Scripts\vSphereDSC> .\ESXiNTP.ps1

    Directory: C:\Scripts\vSphereDSC\ESXiNTP

Mode                LastWriteTime         Length Name
----                -------------         ------ ----
-a----       22/09/2019     19:57           2412 localhost.mof
The MOF file is found in a subfolder with the name of the Configuration and is called localhost.mof. The MOF file is the file actually used by DSC to make the changes. We could write a MOF file by hand, but using PowerShell to do it is much easier.
Another tip - you need to run the configuration in a PowerShell window that is running as Administrator. If you don’t you get the following:
PS C:\Scripts\vSphereDSC> .\ESXiNTP.ps1
out-file : Access to the path 'C:\Scripts\vSphereDSC\ESXiNTP\localhost.mof' is denied.
At
C:\Windows\system32\WindowsPowerShell\v1.0\Modules\PSDesiredStateConfiguration\PSDesiredStateConfiguration.psm1:3086
char:13
+             $nodeDoc > $nodeOutfile
+             ~~~~~~~~~~~~~~~~~~~~~~~
    + CategoryInfo          : OpenError: (:) [Out-File], UnauthorizedAccessException
    + FullyQualifiedErrorId : FileOpenFailure,Microsoft.PowerShell.Commands.OutFileCommand
Running DSC
Now we have the MOF file, we can use DSC to first Test if the configuration of the ESXi host is correct, and then Start the configuration.
I first like to check if the ESXi host is in the state we want. Do do this we use the PowerShell command Test-DscConfiguration:
PS C:\Scripts\vSphereDSC> Test-DscConfiguration -Path .\ESXiNTP -Verbose
VERBOSE: Perform operation 'Invoke CimMethod' with following parameters, ''methodName' = TestConfiguration,'className' = MSFT_DSCLocalConfigurationManager,'namespaceName' = root/Microsoft/Win
dows/DesiredStateConfiguration'.
VERBOSE: An LCM method call arrived from computer IT1 with user sid S-1-5-21-2027855393-2688064357-1577006696-1107.
VERBOSE: [IT1]: LCM:  [ Start  Compare  ]
VERBOSE: [IT1]: LCM:  [ Start  Resource ]  [[VMHostNtpSettings]ESXiNtpSettings]
VERBOSE: [IT1]: LCM:  [ Start  Test     ]  [[VMHostNtpSettings]ESXiNtpSettings]
VERBOSE: [IT1]:                            [[VMHostNtpSettings]ESXiNtpSettings] 22/09/2019 20:11:15	Get-VMHost	Finished execution
VERBOSE: [IT1]: LCM:  [ End    Test     ]  [[VMHostNtpSettings]ESXiNtpSettings] False in 5.2770 seconds.
VERBOSE: [IT1]: LCM:  [ End    Resource ]  [[VMHostNtpSettings]ESXiNtpSettings]
VERBOSE: [IT1]: LCM:  [ End    Compare  ]     Completed processing compare operation. The operation returned False.
VERBOSE: [IT1]: LCM:  [ End    Compare  ]    in  5.6200 seconds.
VERBOSE: Operation 'Invoke CimMethod' complete.

PSComputerName  ResourcesInDesiredState        ResourcesNotInDesiredState     InDesiredState
--------------  -----------------------        --------------------------     --------------
localhost                                      {[VMHostNtpSettings]ESXiNtp... False
VERBOSE: Time taken for configuration job to complete is 5.717 seconds
I like using the -Verbose switch to see exactly what is going on the first few time.
You can see here in the last column InDesiredState is False. Lets change the ESXi host so it is in our desired state using Start-DsConfiguration:
PS C:\Scripts\vSphereDSC> Start-DscConfiguration -Path .\ESXiNTP -Verbose -Wait
VERBOSE: Perform operation 'Invoke CimMethod' with following parameters, ''methodName' = SendConfigurationApply,'className' = MSFT_DSCLocalConfigurationManager,'namespaceName' = root/Microsof
t/Windows/DesiredStateConfiguration'.
VERBOSE: An LCM method call arrived from computer IT1 with user sid S-1-5-21-2027855393-2688064357-1577006696-1107.
VERBOSE: [IT1]: LCM:  [ Start  Set      ]
VERBOSE: [IT1]: LCM:  [ Start  Resource ]  [[VMHostNtpSettings]ESXiNtpSettings]
VERBOSE: [IT1]: LCM:  [ Start  Test     ]  [[VMHostNtpSettings]ESXiNtpSettings]
VERBOSE: [IT1]:                            [[VMHostNtpSettings]ESXiNtpSettings] 22/09/2019 20:12:35	Get-VMHost	Finished execution
VERBOSE: [IT1]: LCM:  [ End    Test     ]  [[VMHostNtpSettings]ESXiNtpSettings]  in 4.9990 seconds.
VERBOSE: [IT1]: LCM:  [ Start  Set      ]  [[VMHostNtpSettings]ESXiNtpSettings]
VERBOSE: [IT1]:                            [[VMHostNtpSettings]ESXiNtpSettings] 22/09/2019 20:12:36	Get-VMHost	Finished execution
VERBOSE: [IT1]:                            [[VMHostNtpSettings]ESXiNtpSettings] 22/09/2019 20:12:37	Get-View	Finished execution
VERBOSE: [IT1]: LCM:  [ End    Set      ]  [[VMHostNtpSettings]ESXiNtpSettings]  in 0.5190 seconds.
VERBOSE: [IT1]: LCM:  [ End    Resource ]  [[VMHostNtpSettings]ESXiNtpSettings]
VERBOSE: [IT1]: LCM:  [ End    Set      ]
VERBOSE: [IT1]: LCM:  [ End    Set      ]    in  5.9090 seconds.
VERBOSE: Operation 'Invoke CimMethod' complete.
VERBOSE: Time taken for configuration job to complete is 5.984 seconds
Again I used -Verbose to get full output. Usually DSC runs as a background job but by using -Wait it keeps the job on screen until completed. You can see here the configuration applied in just under 6 seconds.
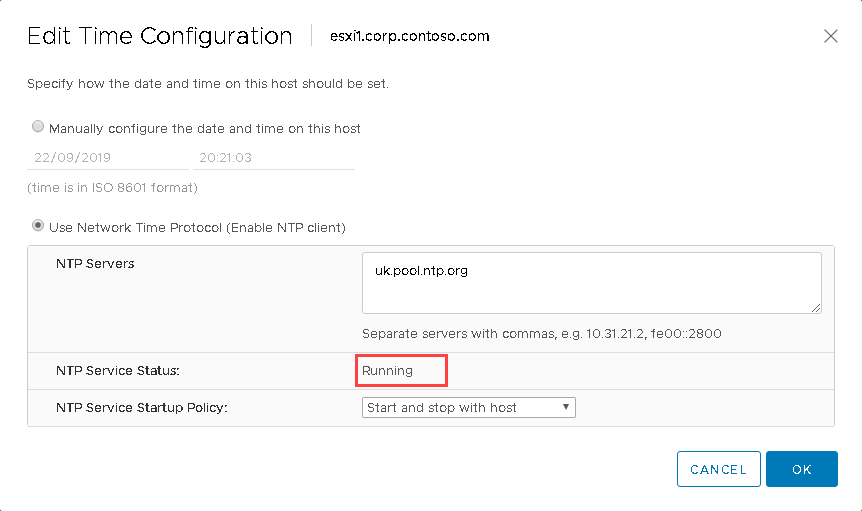
A check in the GUI shows:
Now this may not be what you expect. It’s made the changes and you might assume it would actually start the service but DSC is just setting what we want - a reboot will start the service as we set it to Start and stop with host:
Wrap Up
A kind of long post to get to one simple change. Now we can show a key part of DSC. You can use Test-DscConfiguration to check your NTP settings are correct at any time you want. Also running Start-DscConfiguration any number of times will always set the same configuration no matter what the settings are currently. This is a key part of Infrastructure as Code - Idempotence:
Idempotence is a principle of Infrastructure as Code. Idempotence is the property that a deployment command always sets the target environment into the same configuration, regardless of the environment’s starting state. Idempotency is achieved by either automatically configuring an existing target or by discarding the existing target and recreating a fresh environment.
In Part 3 I will show a couple of vCenter specific examples.