
Windows Patch Slipstreaming
Introduction
I recently bought a new laptop and one of the first things to do was install Windows 11. I downloaded the latest Windows ISO from Microsoft. However, I found that it was several months behind the current build version so I decided to slipstream the latest Windows Cumulative Update (CU) to the ISO before I imaged the laptop.
The last time I did this, I used dism to slipstream the update into the wim file that Windows is installed from. I noticed this time there are PowerShell cmdlets to do everything instead. This post will document the process using those cmdlets.
Versions
In this blog post, I was using the following versions:
- Downloaded Windows 11 Pro 22H2 ISO from Microsoft - Build 22621.525
- Windows 11 Pro 22H2 Cumulative Update February 14th, 2023 - KB5022845
Outline of the process
The steps that will be performed are as follows:
- Download the ISO and CU from Microsoft
- Extract the wim file from the ISO
- Mount the wim file
- Install the CU
- Unmount the wim and convert back to .esd
Download the ISO and CU from Microsoft
Microsoft has the Windows 11 ISO freely available to download. Go to the download page and scroll down to the section Download Windows 11 Disk Image (ISO) for x64 devices.
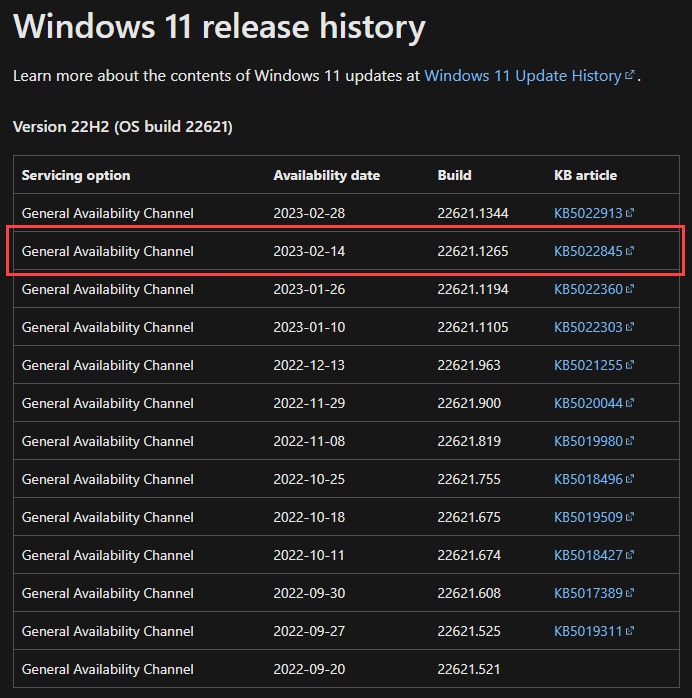
Microsoft makes it easy to find the list of Windows Cumulative Updates. If you don’t have the link you can Google the term Windows 11 update history and one of the top results will be the page Windows 11 release information. In the table under Windows 11 release history, you will see all the CU’s sorted by date. In this example I am going to download the update from 2023-02-14, KB5022845:
Place both files in a temp folder. In the following examples, I am using C:\Temp.
Extract the wim file from the ISO
Now you have the necessary files downloaded, the next step is to get the Windows image file. Use a tool such as 7-Zip to open the ISO file and browse to the sources folder. In there you will see a file called install.esd. Extract this to C:\Temp.
Traditionally a .wim file was in the sources folder but that changed to the .esd format. What is an .esd file? It is an encrypted .wim file
So how do we get the .wim from the .esd? First, check the images in the .esd:
PS C:\Temp> Get-WindowsImage -ImagePath "C:\Temp\install.esd"

ImageIndex       : 1
ImageName        : Windows 11 Home
ImageDescription : Windows 11 Home
ImageSize        : 16,168,829,996 bytes

ImageIndex       : 2
ImageName        : Windows 11 Home N
ImageDescription : Windows 11 Home N
ImageSize        : 15,506,889,019 bytes

ImageIndex       : 3
ImageName        : Windows 11 Home Single Language
ImageDescription : Windows 11 Home Single Language
ImageSize        : 16,153,401,297 bytes

ImageIndex       : 4
ImageName        : Windows 11 Education
ImageDescription : Windows 11 Education
ImageSize        : 16,463,631,301 bytes

ImageIndex       : 5
ImageName        : Windows 11 Education N
ImageDescription : Windows 11 Education N
ImageSize        : 15,808,633,936 bytes

ImageIndex       : 6
ImageName        : Windows 11 Pro
ImageDescription : Windows 11 Pro
ImageSize        : 19,716,867,544 bytes

ImageIndex       : 7
ImageName        : Windows 11 Pro N
ImageDescription : Windows 11 Pro N
ImageSize        : 15,810,170,147 bytes

ImageIndex       : 8
ImageName        : Windows 11 Pro Education
ImageDescription : Windows 11 Pro Education
ImageSize        : 16,463,581,511 bytes

ImageIndex       : 9
ImageName        : Windows 11 Pro Education N
ImageDescription : Windows 11 Pro Education N
ImageSize        : 15,808,583,246 bytes

ImageIndex       : 10
ImageName        : Windows 11 Pro for Workstations
ImageDescription : Windows 11 Pro for Workstations
ImageSize        : 16,463,606,406 bytes

ImageIndex       : 11
ImageName        : Windows 11 Pro N for Workstations
ImageDescription : Windows 11 Pro N for Workstations
ImageSize        : 15,808,608,591 bytes
As you can see the image has several versions of Windows 11 in it. I just want Windows 11 Pro so let’s check that version:
PS E:\Temp> Get-WindowsImage -ImagePath C:\Temp\install.wim -Name "Windows 11 Pro"

ImageIndex       : 6
ImageName        : Windows 11 Pro
ImageDescription : Windows 11 Pro
ImageSize        : 16,479,089,353 bytes
WIMBoot          : False
Architecture     : x64
Hal              :
Version          : 10.0.22621.525
SPBuild          : 525
SPLevel          : 0
EditionId        : Professional
InstallationType : Client
ProductType      : WinNT
ProductSuite     : Terminal Server
SystemRoot       : WINDOWS
DirectoryCount   : 22867
FileCount        : 103384
CreatedTime      : 25/09/2022 02:47:30
ModifiedTime     : 25/09/2022 03:25:18
Languages        : en-US (Default)
You can see this is Windows 11 Pro, Build 22621.525. Checking the build history, this is patched to September 27th, 2022 so a few months out of date.
So now we should extract the .wim from the .esd:
PS C:\Temp> Export-WindowsImage -SourceImagePath "C:\Temp\install.esd" -SourceName "Windows 11 Pro" -DestinationImagePath "C:\Temp\install.wim" -CompressionType max -CheckIntegrity
Mount the wim file
Now we can mount the .wim file. Mounting extracts the .wim file to a folder so the files in the Windows installation can be modified:
# Create a folder to mount the wim into:
PS C:\Temp> New-Item -Path "C:\Temp\mount" -ItemType Directory

# Mount the wim file:
PS C:\Temp> Mount-WindowsImage -ImagePath C:\Temp\install.wim -Name "Windows 11 Pro" -Path C:\Temp\Mount

Path          : C:\Temp\Mount
Online        : False
RestartNeeded : False
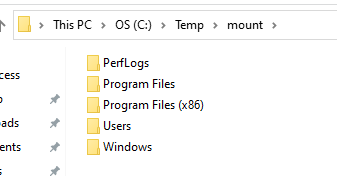
You can browse the mount directory and see the typical files of a Windows installation:
Install the Update
Now we can do some work on the image. Using Add-WindowsPackage you can slipstream the .msu update to the mounted image:
PS C:\Temp> Add-WindowsPackage -Path C:\Temp\Mount -PackagePath C:\Temp\windows11.0-kb5022845-x64_279b2b5fcc98e99c79f85a395cd7e8eef8d06503.msu

Path          : C:\Temp\Mount
Online        : False
RestartNeeded : False
As easy as that. Now the image has been updated I like to use Repair-WindowsImage to clean up superseded components and reset the base of superseded components to reduce the size of the component store:
PS C:\Temp> Repair-WindowsImage -Path C:\Temp\Mount -StartComponentCleanup -ResetBase

Path             : C:\Temp\Mount
Online           : False
ImageHealthState : Healthy
RestartNeeded    : False
Unmount the wim and convert to ESU
We are now ready to unmount the wim file that has been patched. Using Dismount-WindowsImage:
PS C:\Temp> Dismount-WindowsImage -Path C:\Temp\Mount -Save

LogPath : C:\Windows\Logs\DISM\dism.log
Checking the build version of the patched install.wim to see if it has been updated:
PS C:\Temp> Get-WindowsImage -ImagePath C:\Temp\install.wim -Name "Windows 11 Pro"

ImageIndex       : 6
ImageName        : Windows 11 Pro
ImageDescription : Windows 11 Pro
ImageSize        : 19,699,409,370 bytes
WIMBoot          : False
Architecture     : x64
Hal              :
Version          : 10.0.22621.1265
SPBuild          : 1265
SPLevel          : 0
EditionId        : Professional
InstallationType : Client
ProductType      : WinNT
ProductSuite     : Terminal Server
SystemRoot       : WINDOWS
DirectoryCount   : 30127
FileCount        : 127185
CreatedTime      : 25/09/2022 02:47:30
ModifiedTime     : 19/03/2023 16:25:18
Languages        : en-US (Default)
The Version is now build 22621.1265 which matches the downloaded .msu version. This means we have a patched install.wim file. The last step is to convert this to the original install.esd file:
PS C:\Temp> Export-WindowsImage -SourceImagePath C:\Temp\install.wim -SourceName "Windows 11 Pro" -DestinationImagePath C:\Temp\install.esd -CompressionType max

LogPath : C:\Windows\Logs\DISM\dism.log
The install.esd can now be placed back into the extracted ISO folder in the Sources folder. An ISO can be created from this folder and used to build a Windows 11 Pro machine.
Commands Used
For reference, the commands used in this post with the links to the Microsoft documentation are:
- Get-WindowsImage
- Export-WindowsImage
- Mount-WindowsImage
- Add-WindowsPackage
- Repair-WindowsImage
- Dismount-WindowsImage
- New-Item
Wrap Up
Having a Windows 11 installation image with the latest Cumulative Update has two benefits:
- More secure Windows installation from build time
- Less time spent patching the new machine after installation
As I said most guides use the dism commands to accomplish the steps above, but for me, PowerShell FTW!
Watch out for Part 2 where I detail now to patch the WinRE image.