
PuTTY Setup
Introduction
PuTTY is one of those invaluable tools that every Operations person has used. I personally pay for SecureCRT to run on my own machine but I always keep a copy of PuTTY available on the other machines I use. I always used a particular link to customise PuTTY setup to how I like it, but the website is now dead.
Luckily I use the fantastic Pocket and it had a cached version of the site there. I’m going to document the settings here mainly for my own reference but I’m sure everyone can use this to set up PuTTY optimally.
Default Settings
Before any customisation is made, make sure to apply the settings to the Default Settings saved sessions profile. Click on Category: Sessions...Default Settings and then Load:
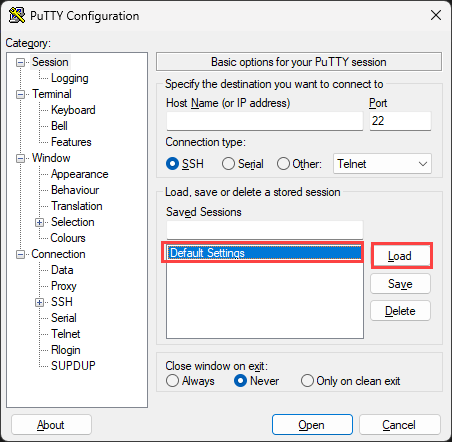
This will ensure any new sessions going forward will inherit the settings we are going to set.
The Settings
Make SSH the default. The first one may seem obvious, but make sure SSH is the default protocol. Go to Category: Session and select SSH.
Log your session. Always log your session so you can go back and see what happened. If you don’t do this once you close the window your work is gone forever. Go to Category: Session...Logging. Under Session logging select Printable output. You also need to set a Log file name. Choose a path but set the file name to &H_&Y-&M-&D_putty.log. This will set the file name to hostname_year_month_day_putty.log. I also choose Always append to the end of it.
Keep windows around. By default when a session closes, PuTTY closes the window too. Sometimes I want to scroll back to look at the session output. To keep the window open go to Category: Session and select Close window on exit to Never.
Annoying PC bell. Some systems have an annoying PC speaker bell. Instead, enable visual bell. Go to Category: Terminal..Bell and select Visual bell (flash window). I also set taskbar to flash on a bell. Go to Category: Terminal..Bell and select Flashing.
Increase scrollback buffer. By default Putty buffers 200 lines of output which is way too little. I usually go to 20,000. Go to Category: Window and under Lines of scrollback change to 20000.
Scrollback behaviour It’s annoying when you are scrolling back output while the system still producing output, the terminal jumps back to the bottom. Go to Category: Window and disable Reset scrollback on display activity. Also, enable Reset scrollback on keypress.
Choose a good font. By default, PuTTY will use a ClearType font, but I personally like Cascadia Code. Go to Category: Window...Appearance, choose ClearType and your preferred font.
Use proper character encoding. Nowadays all Linux systems can use Unicode (UTF-8) so to make sure that the output in Putty (especially everything non-ascii) looks fine, go to Category: Window...Translation and change the Remote character set to UTF-8. Make sure to also select Use Unicode line drawing code points.
Actions of mouse buttons. I use a Windows system so make Putty work with Windows better. Go to Category: Window...Selection and under Action of mouse buttons choose Windows (Middle extends, Right brings up menu).
Copy and paste. If you like output copied from PuTTY to keep the formatting when pasting into Word, you can do that as well as plain text. Go to Category: Window...Selection...Copy and select Copy to clipboard in RTF as well as plain text.
Change dark colours on a black background. One of the more annoying things with terminal applications is that by default dark-blue is too dark to be visible on a black background. go to Category: Window...Colours and select ANSI Blue under Select a colour to adjust. Change RGB values to Red:74, Green:74, Blue:255. Change ANSI Blue Bold to Red:140, Green:140, Blue:255.
Keeping idle sessions active. It’s annoying when your sessions are too long idle and time out if the remote device kicks you off. Send keep-alive packets. Go to Category: Connection and set Seconds between keepalives (0 to turn off) to 25.
Enable X11 forwarding. Together with Xming, PuTY allows you to run graphical Linux applications on your Windows system, so enabling X11 forwarding by default can be useful. Go to: Connection...SSH...X11 and check Enable X11 forwarding.
Wrap Up
Once all the customisation is set make sure you save them to the default session. Go to Category: Session and select Default Settings and then Save.
Bonus tip: Save your setup so if you need to use it on another computer you can just merge it into the registry file. Open a command prompt and use
regedit /e "%USERPROFILE%\desktop\putty.reg" HKEY_CURRENT_USER\Software\Simontathamto export all your settings to the Desktop.
Any other settings you recommend? Please let me know and I will add them to this post.