
RVTools - Exporting Information
Introduction
I have used (and blogged about) RVTools for many years but only recently I took the time to RTFM and realised I was missing out on some valuable functionality. ‘Hidden’ in the installation folder are some very useful utilities and scripts that can aid you in exporting the incredible information it provides. Also detailed are some command line switches that can be used with the main rvtools.exe to aid some automation in exporting the information you are looking for.
Command Line Switches
I always used to just fire up the main GUI based application and navigated to the tab required and exported the information using the menu option.
However there are ways to pass the necessary details to the executable to either script out getting the information from RVTools or just saving you time.
The switches for the RVTools.exe are:
- -s - the ESXi host or vCenter you want to connect too
- -passthrough - use pass-through authentication to connect to the ESXi host or vCenter
- -u - username to connect to the ESXi host or vCenter
- -p - password to connect to the ESXi host or vCenter
- -c - the export option you wish. More on this below
- -d - the directory you want to export the xlsx or csv too
- -f - the filename you want to call the exported information
The -c export switch can give you many options. You can use it to pick exporting to csv or xlsx, and then all tabs or a single tab of information:
- -c ExportAll2xlsx - Export all tabs to xlsx format
- -c ExportAll2csv - Export all tabs to csv format
- -c ExportXXX2xlsx - where XXX represents an individual tab in RVTools and export to xlsx
- -c ExportXXX2csv - where XXX represents an individual tab in RVTools and export to csv
The individual tabs in RVTools as per the XXX above are:
- vInfo
- vCPU
- vMemory
- vDisk
- vPartition
- vNetwork
- vFloppy
- vCD
- vSnapshot
- vTools
- vRP
- vCluster
- vHost
- vHBA
- vNIC
- vSwitch
- vPort
- dvSwitch
- dvPort
- vSC+VMK
- vDatastore
- vMultiPath
- vLicense
- vHealth
Some examples could be:
# Connect to a vCenter using pass-through authentication and export all tabs to xlsx in the current directory with default filename
RVTools.exe -s vcsa.corp.contoso.com -passthrough -c ExportAll2xlsx

# Connect to a vCenter using username/password authentication and export all tabs to csv to a file in C:\Temp\RVTools_export_YYYY-MM-DD_HH.MM.SS.xlsx
RVTools.exe -s vcsa.corp.contoso.com -u administrator@vsphere.local -p VMware1! -c ExportAll2csv -d C:\Temp

# Connect to a vCenter using pass-through authentication and export vInfo tab to xlsx to C:\Temp\vcsa1-vInfo.xlsx
RVTools.exe -s vcsa.corp.contoso.com -passthrough -c ExportvInfo2xlsx -d C:\Temp -f vcsa1-vInfo.xlsx

# Connect to a vCenter using username/password authentication and export vHealth tab to csv to C:\Temp\vcsa1-vHealth.csv
RVTools.exe -s vcsa.corp.contoso.com -u administrator@vsphere.local -p VMware1! -c ExportvHealth2csv -d C:\Temp -f vcsa1-vHealth.csv
You can see with the command line switches you could setup a scheduled task to export all (or some) of the RVTools information to a share on a regular basis. For example you could have a daily export of the Health information waiting for you in a share once a week to review.
Email a RVTools Export
Exporting on a schedule to a share is fine, but then you have to remember to go and look at it. A better solution is to have it waiting in your inbox. There is a script in the RVTools folder that can take care of this for you.
In the RVTools installation folder there is a file called RVToolBatch.cmd. If I wanted it to email me an export of the vHealth tab I could amend it as so:
rem #########################
rem Name	RVToolsBatch
rem By		RobWare
rem Date	December 2017
rem Version	3.10.1
rem #########################

rem =====================================
rem Include robware/rvtools in searchpath
rem =====================================
set path=%path%;c:\program files (x86)\robware\rvtools


rem =========================
rem Set environment variables
rem =========================
set $VCServer="vcsa.corp.contoso.com"
set $SMTPserver="smtprelay.corp.contoso.com"
set $SMTPport="25"
set $Mailto="cwestwater@corp.contoso.com"
set $Mailfrom="rvtools@corp.contoso.com"
set $Mailsubject="RVTools vHealth report"
set $AttachmentDir="C:\temp"
set $AttachmentFile="vcsa1-vHealth.xlsx"


rem ===================
rem Start RVTools batch
rem ===================
rvtools.exe -passthroughAuth -s %$VCServer% -c ExportvHealth2xlsx -d %$AttachmentDir% -f %$AttachmentFile%


rem =========
rem Send mail
rem =========
rvtoolssendmail.exe /smtpserver %$SMTPserver% /smtpport %$SMTPport% /mailto %$Mailto% /mailfrom %$Mailfrom% /mailsubject %$Mailsubject% /attachment %$AttachmentDir%\%$AttachmentFile%
You can see I set the environment variables and then change the line in Start RVTools batch to -c ExportvHealth2xlsx. The script uses a utility called rvtoolssendmal.exe to send the export to email. Set this up as a scheduled task an you have a handy report.
Multiple vCenters
The command lines and batch file above are great when you are dealing with one vCenter, but like me you may have several you want to get an export from. You could run multiple commands from above, but then you will have multiple csv or xlsx files to merge or manage.
We have two options here. We can run multiple exports from multiple ESXi hosts or vCenters and merge them using the RVToolsMergeExcelFiles.exe provided in the installation folder.
To demonstrate we may have two vCenters we export the vHealth information from. We wish to merge the xlsx files. This would be done with:
RVToolsMergeExcelFiles.exe -input C:\Temp\vcsa1-vHealth.xlsx;C:\Temp\vcsa2-vHealth.xlsx -output C:\Temp\merged-vHealth.xlsx
Done.
We would now have one xlsx file with health information from both vCenters. Again this is fine if you just want to have the file in a folder, but there is a way to send it via a PowerShell script called RVToolsBatchMultipleVCs.ps1.
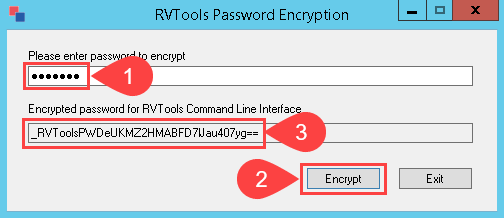
Setting this script up is a bit more involved. First of all we need to use a utility called RVToolsPasswordEncryption.exe to generate a secure password that can be used in the script so we are not exposing passwords. Start the utility and enter the password. Click Encrypt and then copy the encrypted password:
Next open RVToolsBatchMultipleVCs.ps1. You can immediately see the section:
# -----------------------------------------------------
# Set parameters for vCenter 1 and start RVTools export
# -----------------------------------------------------
[string] $VCServer = "192.168.2.220"                                                    # my test vCenter server
[string] $User = "vsphere.local\rob"                                                    # or use -passthroughAuth
[string] $EncryptedPassword = "_RVToolsPWD2b0J6haEx3lZxIzF0Tv6rMMm5BSGQHtTP++9jjiMMVs=" # use RVToolsPasswordEncryption.exe to encrypt your password
[string] $XlsxDir1 = "C:\RVTools"
[string] $XlsxFile1 = "vCenter1.xlsx"
Just edit the parameters to match your first vCenter, replacing the variable $EncryptedPassword with the output from RVToolsPasswordEncryption.exe. So for example I would change the above to:
# -----------------------------------------------------
# Set parameters for vCenter 1 and start RVTools export
# -----------------------------------------------------
[string] $VCServer = "vcsa1.corp.contoso.com"                                           # my test vCenter server
[string] $User = "corp\a-cwestwater"                                                    # or use -passthroughAuth
[string] $EncryptedPassword = "_RVToolsPWD2b0J6haEx3lZxIzF0Tv6rMMm5BSGQHtTP++9jjiMMVs=" # use RVToolsPasswordEncryption.exe to encrypt your password
[string] $XlsxDir1 = "C:\Temp"
[string] $XlsxFile1 = "vcsa1.xlsx"
Repeat for the sections for vCenter 2 and 3. Simply copy and paste additional parameter sections for 4 or more vCenters.
Note however to update the variables
$XlsxDirand$XlsxFilewith additional numbers.
Once you have all your vCenters defined scroll down to the bottom of the script to this section:
# -----------------------------------------------
# Merge xlsx files vCenter1 + vCenter2 + vCenter3
# -----------------------------------------------
Here (if only connecting to three vCenters) edit the variable $OutputFile to the location you wish to save the file into. This then uses the utility RVToolsMergeExcelFiles.exe to merge the exported xlsx files (no Excel installation required on the machine) and save it to the file as defined in $OutputFile.
There is an error in script in the line for
RVToolsMergeExcelFiles.exe. The command line switches-inputfilesand-outputfileare wrong. They should be changed to-inputand-outputrespectively.
If you had more than three vCenters exporting information, you would just amend the merge utility line as so:
& .\RVToolsMergeExcelFiles.exe -input "$XlsxDir1\$XlsxFile1;$XlsxDir2\$XlsxFile2;$XlsxDir3\$XlsxFile3;$XlsxDir4\$XlsxFile4;$XlsxDir5\$XlsxFile5" -output $OutputFile -overwrite -verbose
At this point you have a xlsx file with all the details for the multiple vCenters. At the end of the script is some code to email the merged xlsx file. Just edit the variables for your environment. For example:
# Mail output xlsx file

[string] $SMTPserver = "smtprelay.corp.contoso.com"
[string] $SMTPport = "25"
[string] $Mailto = "cwestwater@corp.contoso.com"
[string] $MailFrom = "rvtools@corp.contoso.com"
[string] $MailSubject = "`"RVTools export all for vCenters""
then finally uncomment the line:
Start-Process -FilePath ".\RVToolsSendmail.exe" -ArgumentList $Arguments -NoNewWindow -Wait
Once the script is run the merged xlsx file will be emailed to the address provided.
One last customisation of the script could be to change the exported information. By default for each vCenter is uses the command line switch -c ExportAll2xlsx:
$Arguments = "-u $User -p $EncryptedPassword -s $VCServer -c ExportAll2xlsx -d $XlsxDir1 -f $XlsxFile1 -DBColumnNames -ExcludeCustomAnnotations"
Like the previous section if you say just want the vInfo tab exported information, search in the script for each instance of ExportAll2xlsx and replace with ExportvInfo2xlsx.
Wrap Up
This blog post is not ground breaking stuff, but I wanted to highlight additional functionality in RVTools you may not know about. Until I actually RTFM I didn’t know about these things and I hope this will spur you on to looking into using RVTools further.
I didn’t cover such things as Template files so please go ahead and have a look at the PDF manual in the installation directory to get some more information.
Thanks for Rob de Veij for creating a great utility and as a rarity these days, a great manual.