
Modifying NTFS Permissions Using PowerShell
Introduction
I have been working on NetApp ONTAP recently and when a CIFS/SMB share is created, by default the NTFS permissions it set to Everyone/Full Control. Obviously this is not ideal and should be changed in a production environment to something more suitable.
In this post I’m going to do an overview on the best practice AGDLP to secure shares and how to modify NTFS permissions using PowerShell.
AGDLP
Account, Global, Domain Local, Permission (AGDLP) is the ‘best practice’ way of assigning permissions to file shares. This gets you to Role Based Access Control (RBAC) which simplifies account management, permissions and auditing.
Too often you see on a file share random groups with random permissions applied, or even worse users accounts directly applied. This is just opening a nightmare of not knowing who has access to what. Using the principles of AGDLP means you can gain much more control of who has access to what. The basics of AGDLP are:
- You apply Permissions to a share such as Modify, Read & Execute, Full Control, etc. You use a Domain Local group to define the permission
- Next place a Global Group that defines a role in the business. This is added to the Domain Local group above
- Lastly add Accounts to the Global Groups above

Let’s look at a practical example. A common share that would be is a Finance department share. On the share you could have the following Domain Local groups applied:
- DL-File-Share-Finance-FC: Full Control permissions on the share
- DL-File-Share-Finance-MD: Modify permissions on the share
- DL-File-Share-Finance-RO: Read Only permissions on the share
Next thing about some business roles. Some obvious ones are that could be defined in Global Groups are:
- GG-UK-Finance-Users: all accounts that are part of the marketing department in the UK
- GG-US-Finance-Users: all accounts that are part of the marketing department in the US
- GG-UK-Auditors-Users: all accounts that part of the audit team in the UK
- GG-WW-Executives-Users: all accounts that are part of the C Suite World Wide
- GG-UK-IT-Users: all accounts that are part of the UK IT team
In those Global Groups you would have the appropriate Active Directory Accounts.
How would you apply those Global Groups to the Domain Local Groups?
- DL-File-Share-Finance-FC: membership includes GG-UK-IT-Users
- DL-File-Share-MD: membership includes GG-UK-Finance-Users and GG-US-Finance-Users
- DL-File-Share-Finance-RO: membership includes GG-WW-Executives-Users and GG-UK-Auditors-Users
You can see the flexibility this grants you. You group a set of common user accounts in a Global Group which is then applied to the Domain Local group that sets the permissions you want for that group to the file share. If the security team wanted to know who had Modify Access to the share you can easily look at the group DL-File-Share-Finance-MD, then see you just need to export the users in the groups GG-UK-Finance-Users and GG-US-Finance-Users.
This also means you don’t have the pain of applying inheritance down a potentially large share. Wil the three Domain Local groups applied to the share already, adding and removing users to the file share permissions gets round the problem of hitting apply to a permissions changes and the the OS applying the new permissions down the file share chain.
Multiple Domains
So you might think why not just have the Global Groups applied on the file share with the permissions applied. Well first is it’s not really obvious right away what permissions the group actually has. What is more applicable of using Domain Local groups to the file shares is in the case of multiple domains.
In the example above what if GG-UK-Finance-Users was part of a domain called Europe, and the GG-US-Finance-Users was part of a domain called Americas. Well applying permissions across the domains is much easier using the AGDLP method. As the file share has Domain Local groups applied, you can nest the two Finance groups from the two domains in the Domain Local group. This makes the IT departments role in permission management a breeze.
Bonus Tip
A tip I read recently was to have a Domain Local Deny group (with Deny permissions) in place on all shares, with a Global Group from each domain called Deny nested in it. Why do this? A good example is HR comes to you and says I want to make sure a disgruntled employee cannot access any of the file shares. You place the user account in the Deny group in their domain, and they are instantly blocked from accessing all shares, even if they are members of a group that does have access. Remember Deny always trumps Allow permissions.
Another example use case for this Deny group is a ransomware attack. You discover a user account has been compromised and bad things are happening on the shares. Place the account in the Deny group and cut it off.
How To in PowerShell
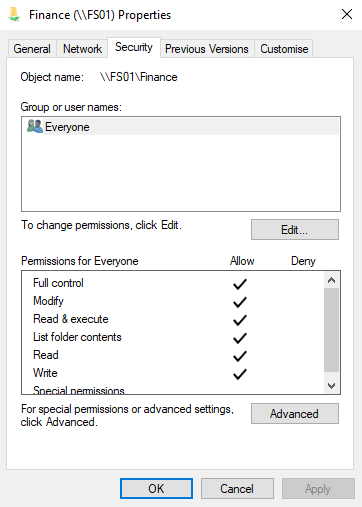
So how do we do this in PowerShell? There are various community authored modules on the PowerShell gallery for managing NTFS permissions, but I like to know the ‘native’ way of doing it. Unfortunately in PowerShell the native way is a bit confusing initially and not very intuitive. We will use the Finance file share example above which is hosted on a NetApp Storage Virtual Machine called FS01 on the Domain euro.contoso.com. You can see the default permissions in the GUI:
I’m going to assume the three Domain Local AD Groups already exist as defined above. You can view the PowerShell help for New-ADGroup for details on how to create groups.
First I will define the name of the share we want to modify the NTFS permissions on:
$folder = "\\fs01.euro.contoso.com\Finance"
Next we need to read in the Access Control List (ACL) on the folder and store it in a variable:
$acl = Get-Acl -Path $folder
What does the ACL look like?
PS C:\> $acl | Format-List

Path   : Microsoft.PowerShell.Core\FileSystem::\\fs01.euro.contoso.com\Finance\
Owner  : BUILTIN\Administrators
Group  : BUILTIN\Administrators
Access : Everyone Allow  FullControl
         Everyone Allow  268435456
Audit  :
Sddl   : O:BAG:BAD:(A;;FA;;;WD)(A;OICIIO;GA;;;WD)
I prefer this view by using the .access property of the ACL:
PS C:\> $acl.access

FileSystemRights  : FullControl
AccessControlType : Allow
IdentityReference : Everyone
IsInherited       : False
InheritanceFlags  : None
PropagationFlags  : None

FileSystemRights  : 268435456
AccessControlType : Allow
IdentityReference : Everyone
IsInherited       : False
InheritanceFlags  : ContainerInherit, ObjectInherit
PropagationFlags  : InheritOnly
You can see the NetApp default of Everyone with Full Control. We will remove this later once we build the new ACL.
The way PowerShell works with NTFS permissions is to build an ACL object with the permissions model we need to get to. Each permission is an Access Control Entry (ACE). We start with the ACL we have in the variable $acl and edit it to how we want the end result to look like. This is done by create some variables with the properties of the ACE.
First we want to define the Everyone permission:
# Define everyone
$everyone = New-Object System.Security.Principal.NTAccount("Everyone")
You can see the variable $everyone is a New Object of type Security, and the account Everyone.
Next create variables for the three Domain Local Groups for Full Control, Modify and Read Only permission:
# Define Full Control Group
$fcRule = New-Object System.Security.AccessControl.FileSystemAccessRule("euro\DL-File-Share-Finance-FC","FullControl","ContainerInherit,ObjectInherit","None","Allow")

# Define Modify Group
$mdRule = New-Object System.Security.AccessControl.FileSystemAccessRule("euro\DL-File-Share-Finance-MD","Modify","ContainerInherit,ObjectInherit","None","Allow")

# Define Read Only Group
$roRule = New-Object System.Security.AccessControl.FileSystemAccessRule("euro\DL-File-Share-Finance-RO","ReadAndExecute","ContainerInherit,ObjectInherit","None","Allow")
Lets break down the format of the variables choosing the Full Control as an example. We are creating an object of the type File System Access Rule. The parameters set are:
euro\DL-File-Share-Finance-FCis the group we are using for permissionsFullControlis the permission we want to apply, Full Control in this caseContainerInherit,ObjectInheritis the inheritance flag. These two options mean propagate to both child directories and filesNoneis that no inheritance flags are setAllowmeans we are allowing the permission
The best blog post I have count that explains the inheritance and propogation flags is Changing NTFS Security Permissions using PowerShell by Luke Arntz. Full credit to Luke and I have recreated the table I finally understood the combination of flags meant for options usually seen in the GUI:
| Access Rule Applies To | Inheritance Flags | Propagation Flags |
| Subfolders and Files only | ContainerInherit,ObjectInherit | InheritOnly |
| This Folder, Subfolders and Files | ContainerInherit,ObjectInherit | None |
| This Folder, Subfolders and Files | ContainerInherit,ObjectInherit | NoPropagateInherit |
| This folder and Subfolders | ContainerInherit | None |
| Subfolders only | ContainerInherit | InheritOnly |
| This Folder and Files | ObjectInherit | None |
| This Folder and Files | ObjectInherit | NoPropagateInherit |
| This Folder only | None | None |
So now we have the ACE’s defined in three variables, $everyone, $fcRule, $mdRule, and $roRule. Now we need to create the ACL by modifying the saved $acl. You simply add, remove or modfy the ACE for each thing we want to change and add it to the ACL object.
This is a key point. Most blog articles I read just deal with a single ACE/Permissions change. It took me time to realise you can simply keep adding, modifying or deleting ACE entries from the ACL which is stored in the variable.
First we need to disable Inheritance so we have a clean slate to build our permissions:
# Disable Inheritance
$acl.SetAccessRuleProtection($true,$false)
Here we are defining two parameters. The first $true says we are blocking inheritance from the parent folder. The second parameter $false removes the current inherited permissions.
Next we need to remove Everyone. This is done by purging the Everyone ACE from the ACL:
# Remove everyone
$acl.PurgeAccessRules($everyone)
The final step to build the ACL is to add the Domain Local groups:
# Add Full Control Rule
$acl.SetAccessRule($fcRule)

# Add Modify Rule
$acl.SetAccessRule($mdRule)

# Add Read Only Rule
$acl.SetAccessRule($roRule)
If we check the variable $acl we can see what the end state permissions are going to look like:
PS C:\> $acl.Access

FileSystemRights  : FullControl
AccessControlType : Allow
IdentityReference : corp\DL-File-Share-Finance-FC
IsInherited       : False
InheritanceFlags  : ContainerInherit, ObjectInherit
PropagationFlags  : None

FileSystemRights  : Modify, Synchronize
AccessControlType : Allow
IdentityReference : corp\DL-File-Share-Finance-MD
IsInherited       : False
InheritanceFlags  : ContainerInherit, ObjectInherit
PropagationFlags  : None

FileSystemRights  : ReadAndExecute, Synchronize
AccessControlType : Allow
IdentityReference : corp\DL-File-Share-Finance-RO
IsInherited       : False
InheritanceFlags  : ContainerInherit, ObjectInherit
PropagationFlags  : None
So we have the end state saved in the variable $acl and it looks good, but it still needs to be applied. This is done with the cmdlet Set-Acl:
# Apply the permissions
Set-Acl -Path $folder -AclObject $acl
Nothing is returned when you run this, so let’s check in the GUI:
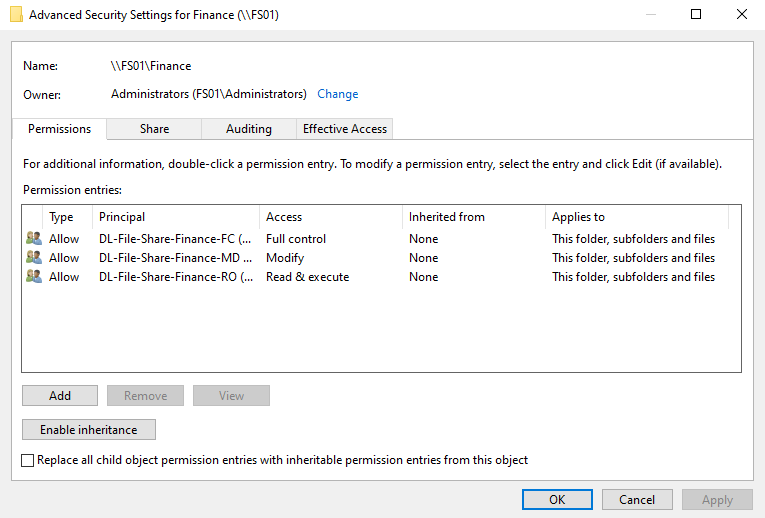
It looks good! Now we can nest Global Groups under the three Domain Local groups to provide the appropriate access permissions to the share.
Wrap Up
This is a simple example of using PowerShell to modify NTFS Permissions. You can integrate a version of the above into a workflow when using NetApp storage to create Volumes on a CIFS SVM. Use the NetApp PowerShell Toolkit to ensure when a share is created, the appropriate permissions are created immediately.