
GPG Keys for Verified GitHub Commits
Introduction
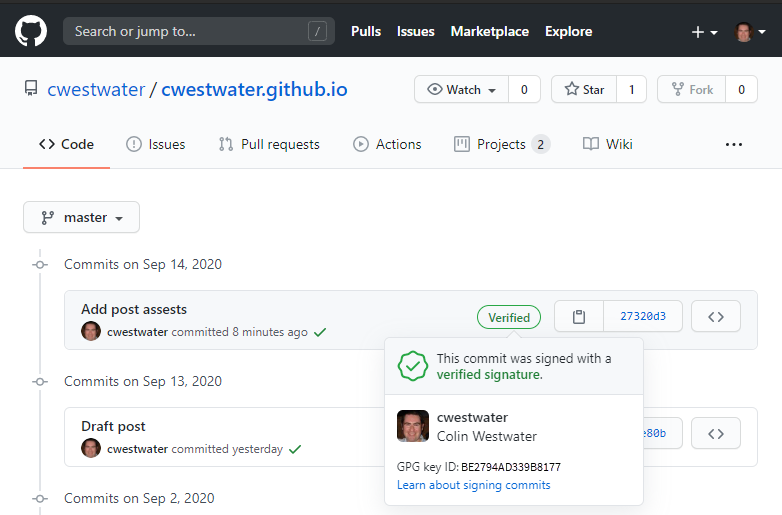
When looking at some repositories in GitHub I noticed a green Verified icon next to some commits:
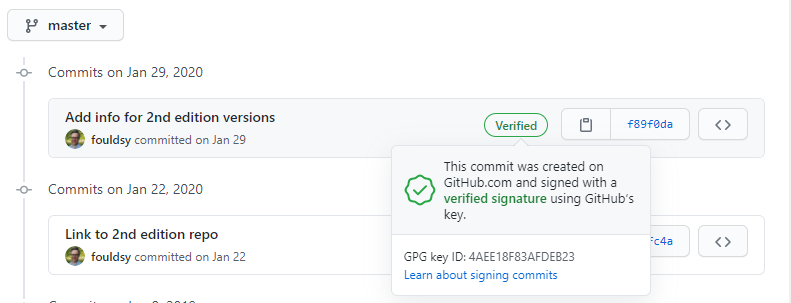
What are these Verified icons? Basically there is a GPG key that is generated on your computer which you export the public key to your GitHub profile. This ensures the commit has come from you and is backed up by using the cryptographically derived key. It is another layer of protection of your commits alongside your username and password (and you also use 2FA for GitHub login right?)
I started looking into this and finally got it working after finding a missing piece of information. This blog post will detail:
- Installing GPG4Win
- Creating a GPG Key
- Setup Git to use the key
- Add the GPG Key to GitHub.com
- Setup Visual Studio Code for signed commits
Assumptions
This is post assumes the following:
- Windows 10 is the OS
- Git for Windows is installed
- Visual Studio Code is installed
- You have a GitHub account
Installing GPG4Win
GPG4Win is used to create the GPG key that we will use. You can download the software from https://www.gnupg.org/download/index.html. On that page scroll down to GnuPG Binary Released and under Windows select the download marked Simple installer for the current GnuPG:
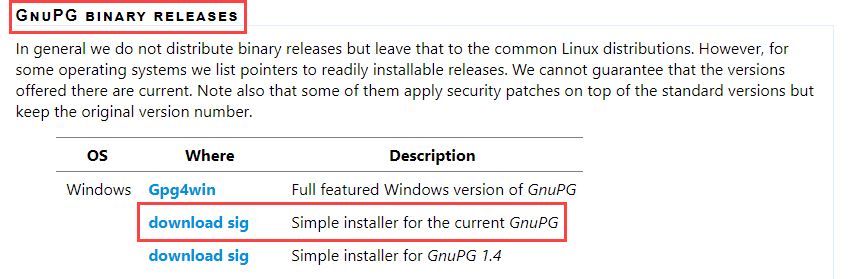
At the time of this blog post this is GnuPG version 2.2.23.
Install is as simple as it gets - Next, Next, Install, Next, Finish. If you want to silent install from a command prompt run:
C:\Users\cwestwater\Downloads\gnupg-w32-2.2.23_20200903.exe /S
Create the GPG Key
Now that GnuGP is installed we can create the key. Open a command prompt and run gpg --full-generate-key. Follow the prompts.
The first is asking what kind of key you want. Select RSA and RSA (default):
C:\Users\cwestwater>gpg --full-generate-key
gpg (GnuPG) 2.2.23; Copyright (C) 2020 Free Software Foundation, Inc.
This is free software: you are free to change and redistribute it.
There is NO WARRANTY, to the extent permitted by law.

Please select what kind of key you want:
   (1) RSA and RSA (default)
   (2) DSA and Elgamal
   (3) DSA (sign only)
   (4) RSA (sign only)
  (14) Existing key from card
Your selection? 1
Next it will ask how log a key you want to generate. Choose 4096:
RSA keys may be between 1024 and 4096 bits long.
What keysize do you want? (3072) 4096
Requested keysize is 4096 bits
Next step will be to define how long you want the key to be valid. I select it does not expire by typing 0:
Please specify how long the key should be valid.
         0 = key does not expire
      <n>  = key expires in n days
      <n>w = key expires in n weeks
      <n>m = key expires in n months
      <n>y = key expires in n years
Key is valid for? (0) 0
Key does not expire at all
Is this correct? (y/N) y
Next is the critical part. You need to define the identity tied to the key. This should match the email address used for your GitHub login:
GnuPG needs to construct a user ID to identify your key.

Real name: Colin Westwater
Email address: cwestwater@gmail.com
Comment:
You selected this USER-ID:
    "Colin Westwater <cwestwater@gmail.com>"

Change (N)ame, (C)omment, (E)mail or (O)kay/(Q)uit? O
At this point you need to secure your key with a passphrase. A popup will appear to enter it. This should be complex. I generated a 30 character random secure password and stored it in my password manager.
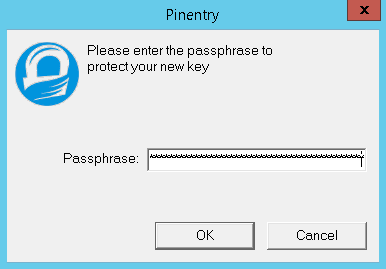
Confirm it in the next popup:

Once the passphrase is entered twice the following message appears:
We need to generate a lot of random bytes. It is a good idea to perform
some other action (type on the keyboard, move the mouse, utilize the
disks) during the prime generation; this gives the random number
generator a better chance to gain enough entropy.
We need to generate a lot of random bytes. It is a good idea to perform
some other action (type on the keyboard, move the mouse, utilize the
disks) during the prime generation; this gives the random number
generator a better chance to gain enough entropy.
At this point do some random tasks on your computer. I moved the mouse around then opened notepad and typed a bunch of random characters. Once there has been enough random activity the key is generated:
gpg: key 559AEF6CD6DE0E3F marked as ultimately trusted
gpg: directory 'C:/Users/a-cwestwater/AppData/Roaming/gnupg/openpgp-revocs.d' created
gpg: revocation certificate stored as 'C:/Users/a-cwestwater/AppData/Roaming/gnupg/openpgp-revocsd\4215C8F63A1AC8827E107F25559AEF6CD6DE0E3F.rev'
public and secret key created and signed.

pub   rsa4096 2020-09-12 [SC]
      4215C8F63A1AC8827E107F25559AEF6CD6DE0E3F
uid                      Colin Westwater <cwestwater@gmail.com>
sub   rsa4096 2020-09-12 [E]
The key has been generated. We can check the key and get the key ID by running gpg --list-secret-keys --keyid-format LONG:
C:\Users\cwestwater>gpg --list-secret-keys --keyid-format LONG
gpg: checking the trustdb
gpg: marginals needed: 3  completes needed: 1  trust model: pgp
gpg: depth: 0  valid:   1  signed:   0  trust: 0-, 0q, 0n, 0m, 0f, 1u
C:/Users/cwestwater/AppData/Roaming/gnupg/pubring.kbx
-----------------------------------------------------
sec   rsa4096/BE2794AD339B8177 2020-09-13 [SC]
      7829DA738E0F5D5E2D7C79ABBE2794AD339B8177
uid                 [ultimate] Colin Westwater <cwestwater@gmail.com>
ssb   rsa4096/318F2F822189A11E 2020-09-13 [E]
The key ID in this case is BE2794AD339B8177.
Next step is to get the public key. Run the command gpg --armor --export <ID> > C:\Temp\publicKey.asc replacing <ID> with the key ID above. This pipes the output to a file in C:\Temp\:
C:\Users\cwestwater>gpg --armor --export 9B5282E84DFEC1C5 > C:\Temp\publicKey.asc
If you now open the file publicKey.asc in notepad the Public Key is ready for use.
Setup Git with the key
Now to setup Git to use the key. First thing to do is tell Git where the GnuPG executable is. Run the following command (assuming GnuPG is installed in "C:\Program Files (x86)\GnuPG\bin\gpg.exe"):
C:\Users\cwestwater> git config --global gpg.program "C:\Program Files (x86)\GnuPG\bin\gpg.exe"
Next is to add the key ID to the git config:
C:\Users\cwestwater> git config --global user.signingkey BE2794AD339B8177
Use the key ID identified above. Finally I’m going to configure Git to sign all commits by default no matter what repo I am in:
C:\Users\cwestwater> git config --global commit.gpgsign true
Check Git is setup correctly with git config --list:
C:\Users\cwestwater> git config --list
user.name=Colin Westwater
user.email=cwestwater@gmail.com
user.signingkey=9B5282E84DFEC1C5
gpg.program=C:\Program Files (x86)\GnuPG\bin\gpg.exe
commit.gpgsign=true
I am just showing the lines we are concerned with. Ensure user.email matches the email address you have registered your GitHub account with.
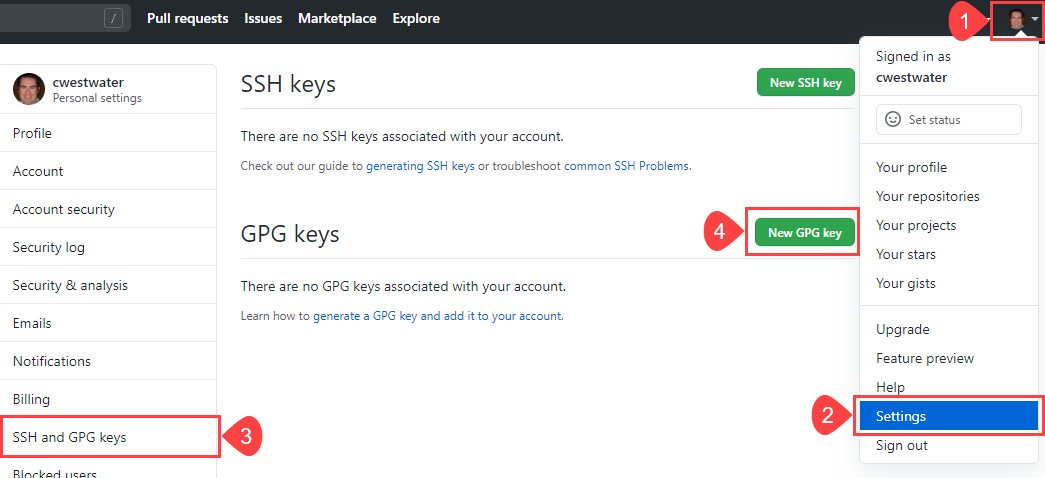
Add the GPG Key to GitHub.com
Now to add the public key from above to your GitHub account. Login to your GitHub account and open you Personal settings and browse to SSH and GPG keys. Click New GPG key:
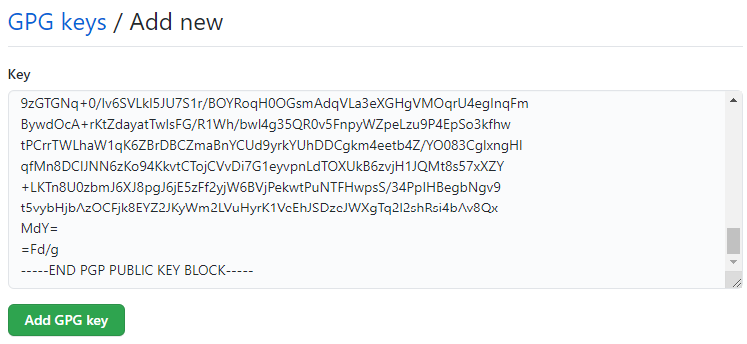
In the Add new box, paste in the public key you saved in the step above to publicKey.asc. Just open this in Notepad, and copy the entire contents. Paste into the box and click Ok:
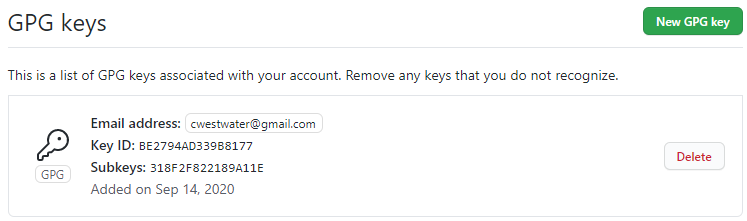
You should see the key in your profile now. Ensure the Key ID matches the key you generated above:
Visual Studio Code Setup
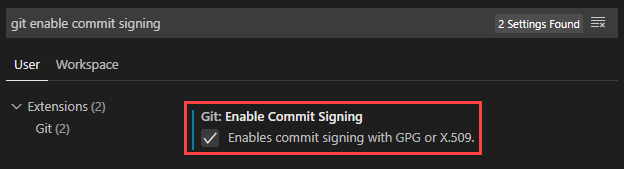
The last piece to complete is to ensure that Visual Studio Code signs commits. Open Visual Studio Code and open Settings. In the search bar look for git enable commit signing and check the box for Enables commit signing with GPG or X.509:
This will ensure when you commit from Visual Studio Code it will use the GPG key to sign your commits in GitHub.
Important Note - I usually use GitHub Desktop as my client for interacting with GitHub. However the GitHub Desktop client does not support GPG key signing
Commits in Visual Studio Code
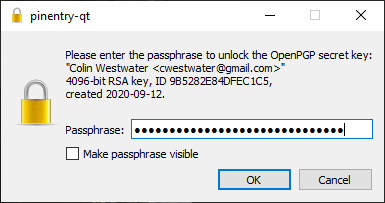
When you commit changes in Visual Studio Code when it tried to use the GPG key to authenticate and sign the commit, there is a requirement to enter the passphrase that was created in the first section Create the GPG Key. Enter the passphrase to continue:
The commit will then work as normal. If you then check GitHub you should see the green Verified icon against your commit:
Wrap Up
None of this is strictly necessary for the average admin. It does add some additional security and verification to your commits, but for me it was just a fun exercise in expanding my knowledge in GitHub. If you want to add that Verified icon to your commits this guide should get you there.
Just remember GitHub Desktop doesn’t support signed commits, so either use the Git command line or Visual Studio Code.