HPE ProLiant iLO SSL Certificate Using Microsoft CA and PowerShell
Introduction
Something that has been on my list for a while to to add SSL certificates to all the various internal apps and management web interfaces so I am not just clicking through the certificate warning in the browser. You can generate the Certificate Signing Request (CSR) from the iLO browser interface but I am going to use the HPE iLO PowerShell cmdlets. I will use an internal Microsoft Certificate Authority to generate the certificate.
Connecting to the iLO
First we need to connect to the iLO. We will create a credential object we will use to authenticate:
# Create the login credential object
$username = "Administrator"
$password = ConvertTo-SecureString -String "Password1" -AsPlainText -Force
$credential = New-Object -TypeName "System.Management.Automation.PSCredential" -ArgumentList $username,$password
Now we can connect to the iLO:
$connection = Connect-HPEiLO -Credential $credential -IP esxi-01-ilo.corp.contoso.com -DisableCertificateAuthentication
Check The Default Certificate
This is easy. Just use the iLO cmdlet Get-HPEiLOSSLCertificateInfo:
Get-HPEiLOSSLCertificateInfo -Connection $connection

Issuer         : CN = iLO Default Issuer (Do not trust), O = Hewlett-Packard Company, OU = ISS, L = Houston, ST = Texas, C = US
SerialNumber   : 0e:06:75:09
Subject        : CN = ILOMXQXXXXXXX, O = Hewlett-Packard Company, OU = ISS, L = Houston, ST = Texas, C = US
ValidNotAfter  : 15/05/2030 23:58:58
ValidNotBefore : 16/05/2015 23:58:58
IP             : 10.10.1.100
Hostname       : esxi-01-ilo.corp.contoso.com
Status         : OK
StatusInfo     :
You can see that the certificate is the default one shipped with the server, so not trusted.
Generating the Certificate Request
Generating the CSR is a two step process. First you need to start a request, wait 10 minutes, then get the CSR.
To start the CSR use the cmdlet Start-HPEiLOCertificateSigningRequest and pass the usual details such as City, Common Name, etc.
Start-HPEiLOCertificateSigningRequest -Connection $connection -City Glasgow -CommonName esxi-01-ilo.corp.contoso.com -Country UK -Organization "Contoso" -State "Lanarkshire" -OrganizationalUnit IT

IP            Hostname                       Status      StatusInfo
--            --------                       ------      ----------
10.10.1.100   esxi-01-ilo.corp.contoso.com   INFORMATION HPE.iLO.Response.StatusInfo
Make sure to use the FQDN of the iLO as the Common Name. The iLO is now generating the CSR. This can take up to 10 minutes so be patient. There is no visual indicator that it has completed. You get the CSR by using the cmdlet Get-HPEiLOCertificateSigningRequest:
Get-HPEiLOCertificateSigningRequest -Connection $connection

CertificateSigningRequest : -----BEGIN CERTIFICATE REQUEST-----
                            XXXXXXXXXXXXXXXXXXXXXXXXXXXXXXXXXXXXXXXXXXXXXXXXXXXXXXXXXXXXXXXX
                            YWwxCzAJBgNVBAsMAklUMSMwIQYDVQQKDBpEb3ZlciBQcmVjaXNpb24gQ29tcG9u
                            XXXXXXXXXXXXXXXXXXXXXXXXXXXXXXXXXXXXXXXXXXXXXXXXXXXXXXXXXXXXXXXX
                            MIIBIjANBgkqhkiG9w0BAQEFAAOCAQ8AMIIBCgKCAQEAwOWJY083oC6l4XqKL6UA
                            XXXXXXXXXXXXXXXXXXXXXXXXXXXXXXXXXXXXXXXXXXXXXXXXXXXXXXXXXXXXXXXX
                            WpeG55AqLD7ePrt7Cdtsf+hOKuh+JvwWMJPpjZIUIntqdidj2YN4jtoIKQsGztAB
                            XXXXXXXXXXXXXXXXXXXXXXXXXXXXXXXXXXXXXXXXXXXXXXXXXXXXXXXXXXXXXXXX
                            u5ww/ow7QKietrTyx3VW5Eb+Tn8x1FggZkH/Ahz8kUenNNEdSznorp/XFxMzkPiI
                            XXXXXXXXXXXXXXXXXXXXXXXXXXXXXXXXXXXXXXXXXXXXXXXXXXXXXXXXXXXXXXXX
                            HwIDAQABoE8wTQYJKoZIhvcNAQkOMUAwPjA8BgNVHREENTAzghlyaWMtZXN4aS0w
                            XXXXXXXXXXXXXXXXXXXXXXXXXXXXXXXXXXXXXXXXXXXXXXXXXXXXXXXXXXXXXXXX
                            DQEBCwUAA4IBAQBNOD59Oh/qiJ7zL8oADp5MOdwLR8DR1kKrIvTKKmqMUXz7ziFk
                            XXXXXXXXXXXXXXXXXXXXXXXXXXXXXXXXXXXXXXXXXXXXXXXXXXXXXXXXXXXXXXXX
                            WVcvbQ/D4Veaw0tKvcT29MMeFyYQdrbTxrSh/7E6AJFHXH6HPuBEFNRVVuqWD0p0
                            XXXXXXXXXXXXXXXXXXXXXXXXXXXXXXXXXXXXXXXXXXXXXXXXXXXXXXXXXXXXXXXX
                            /hA6rAl+TDL7fdvpWBUav2T/2AuXwywRREC9ZCZ3gV4EtTJqZlAfBU0mrDLFLE6S
                            9EldVlImIlauP6vaJNdF2ucBSoJZR494Vdjv
                            -----END CERTIFICATE REQUEST-----

IP                        : 10.10.1.100
Hostname                  : esxi-01-ilo.corp.contoso.com
Status                    : OK
StatusInfo                :
Copy the CSR text starting at ----- BEGIN CERTIFICATE REQUEST----- and end at -----END CERTIFICATE REQUEST-----. Open a text editor and paste this in and save as a .csr file such as ilo.csr. We now have the CSR file to generate the certificate.
Microsoft Certificate Authority
This assumes you have a CA template called WebServer for signing websites. There are plenty of tutorials available to help if you don’t know how to do this. Open a command prompt with permissions to request and enroll a certificate. Use certreq.exe and define the correct CA Template for websites, the .csr file and an output .pem file that has the certificate:
C:\Windows\System32>certreq.exe -submit -attrib "CertificateTemplate:WebServer" C:\Temp\ilo.csr C:\Temp\ilo.pem

Active Directory Enrollment Policy
  {BC40841F-D87D-42C6-8BE8-7650FB7AAABB}
  ldap:
RequestId: 58665
RequestId: "58665"
Certificate retrieved(Issued) Issued
A dialog box will pop up asking to confirm which CA to use. Choose the correct one and then the file C:\Temp\ilo.pem is generated. This is the issued certificate.
Applying The Certificate
Now we have the certificate returned in the file C:\Temp\ilo.pem. We need to apply it now to the iLO.
First we need to import the certificate string into a variable. Open the .pem file and copy the text into PowerShell as so:
$cert = @"
-----BEGIN CERTIFICATE-----
MIIG+jCCBeKgAwIBAgIKMyLkAQACAADlITANBgkqhkiG9w0BAQsFADCBizELMAkG
XXXXXXXXXXXXXXXXXXXXXXXXXXXXXXXXXXXXXXXXXXXXXXXXXXXXXXXXXXXXXXXX
A3diYzEmMCQGA1UEChMdV2F1a2VzaGEgQmVhcmluZ3MgQ29ycG9yYXRpb24xKDAm
XXXXXXXXXXXXXXXXXXXXXXXXXXXXXXXXXXXXXXXXXXXXXXXXXXXXXXXXXXXXXXXX
MDk1NjQ2WhcNMjAwODEwMDk1NjQ2WjCBgjELMAkGA1UEBhMCVVMxCzAJBgNVBAgT
XXXXXXXXXXXXXXXXXXXXXXXXXXXXXXXXXXXXXXXXXXXXXXXXXXXXXXXXXXXXXXXX
Q29tcG9uZW50czELMAkGA1UECxMCSVQxIjAgBgNVBAMTGXJpYy1lc3hpLTAyLWls
XXXXXXXXXXXXXXXXXXXXXXXXXXXXXXXXXXXXXXXXXXXXXXXXXXXXXXXXXXXXXXXX
TzegLqXheoovpQCL8skk+ZrhjIfEPZPAPYNhpQjfRMnyYVlTsx6xsVeFnSCk7T3Y
XXXXXXXXXXXXXXXXXXXXXXXXXXXXXXXXXXXXXXXXXXXXXXXXXXXXXXXXXXXXXXXX
g3iO2ggpCwbO0AFJlwPe2xzD3A61xBKW4nXxjal7hydHCHaOjhKh/LXOXbc7Ibiu
XXXXXXXXXXXXXXXXXXXXXXXXXXXXXXXXXXXXXXXXXXXXXXXXXXXXXXXXXXXXXXXX
Oeiun9cXEzOQ+Ii4ZzbqH1Pbb1eWoUrH7Cwpw7y7ep6OdWVgc6XEQGTfMim+4Ijw
XXXXXXXXXXXXXXXXXXXXXXXXXXXXXXXXXXXXXXXXXXXXXXXXXXXXXXXXXXXXXXXX
Mi1pbG8ud2JjLmxvY2FshwQKRHNlhxD+gAAAAAAAAO6x1//+iOfCMB0GA1UdDgQW
XXXXXXXXXXXXXXXXXXXXXXXXXXXXXXXXXXXXXXXXXXXXXXXXXXXXXXXXXXXXXXXX
7tGr/TR/pjCCAUUGA1UdHwSCATwwggE4MIIBNKCCATCgggEshoHSbGRhcDovLy9D
XXXXXXXXXXXXXXXXXXXXXXXXXXXXXXXXXXXXXXXXXXXXXXXXXXXXXXXXXXXXXXXX
Qy1QS0ktRVMwMSxDTj1DRFAsQ049UHVibGljJTIwS2V5JTIwU2VydmljZXMsQ049
XXXXXXXXXXXXXXXXXXXXXXXXXXXXXXXXXXXXXXXXXXXXXXXXXXXXXXXXXXXXXXXX
aWNhdGVSZXZvY2F0aW9uTGlzdD9iYXNlP29iamVjdENsYXNzPWNSTERpc3RyaWJ1
XXXXXXXXXXXXXXXXXXXXXXXXXXXXXXXXXXXXXXXXXXXXXXXXXXXXXXXXXXXXXXXX
b2xsL1dhdWtlc2hhJTIwQmVhcmluZ3MlMjBFbnRlcnByaXNlJTIwQ0EoMikuY3Js
XXXXXXXXXXXXXXXXXXXXXXXXXXXXXXXXXXXXXXXXXXXXXXXXXXXXXXXXXXXXXXXX
PVdhdWtlc2hhJTIwQmVhcmluZ3MlMjBFbnRlcnByaXNlJTIwQ0EsQ049QUlBLENO
XXXXXXXXXXXXXXXXXXXXXXXXXXXXXXXXXXXXXXXXXXXXXXXXXXXXXXXXXXXXXXXX
YXRpb24sREM9d2JjLERDPWxvY2FsP2NBQ2VydGlmaWNhdGU/YmFzZT9vYmplY3RD
XXXXXXXXXXXXXXXXXXXXXXXXXXXXXXXXXXXXXXXXXXXXXXXXXXXXXXXXXXXXXXXX
V0JDLVBLSS1FUzAxLndiYy5sb2NhbC9DZXJ0RW5yb2xsL1dCQy1QS0ktRVMwMS53
XXXXXXXXXXXXXXXXXXXXXXXXXXXXXXXXXXXXXXXXXXXXXXXXXXXXXXXXXXXXXXXX
KS5jcnQwIQYJKwYBBAGCNxQCBBQeEgBXAGUAYgBTAGUAcgB2AGUAcjALBgNVHQ8E
XXXXXXXXXXXXXXXXXXXXXXXXXXXXXXXXXXXXXXXXXXXXXXXXXXXXXXXXXXXXXXXX
YRH7NC9Sur6kVJ51q0QQ4N9i+yp6vJ+mbTgoRGjNWWg7rk6FIzEJNbs4JPvvKU+F
XXXXXXXXXXXXXXXXXXXXXXXXXXXXXXXXXXXXXXXXXXXXXXXXXXXXXXXXXXXXXXXX
TePZzOPkJpS21TynEdCaZlkQE4z+G+S4LMZCXQVU+WhpIYk36XcotFi278btUaCO
XXXXXXXXXXXXXXXXXXXXXXXXXXXXXXXXXXXXXXXXXXXXXXXXXXXXXXXXXXXXXXXX
e5ekr7P2p0Kan4ovcpB0KfRB6DOhplKb0DYzF0nSKDQddR7oWnWAPH8+namByoDG
tIc1zjDoxIZ9lcg5tDI=
-----END CERTIFICATE-----
"@
We can now import it into the iLO using Import-HPEiLOCertificate:
Import-HPEiLOCertificate -Certificate $cert -Connection $connection

IP            Hostname                     Status StatusInfo
--            --------                     ------ ----------
10.10.1.100   esxi-01-ilo.corp.contoso.com WARNING HPE.iLO.Response.StatusInfo
It takes a minute or two for the certificate to apply. You can then check the certificate on the iLO:
Get-HPEiLOSSLCertificateInfo -Connection $connection

Issuer         : C = UK, DC = com, DC = contoso, DC = corp, O = Contoso, CN = Contoso Enterprise CA
SerialNumber   : 33:22:e4:01:00:02:00:00:e5:21
Subject        : C = UK, ST = Lanarkshire, L = Glasgow, O = Contoso, OU = IT, CN = esxi-01-ilo.corp.contoso.com
ValidNotAfter  : 10/08/2020 09:56:46
ValidNotBefore : 11/08/2018 09:56:46
IP             : 10.10.1.100
Hostname       : esxi-01-ilo.corp.contoso.com
Status         : OK
StatusInfo     :
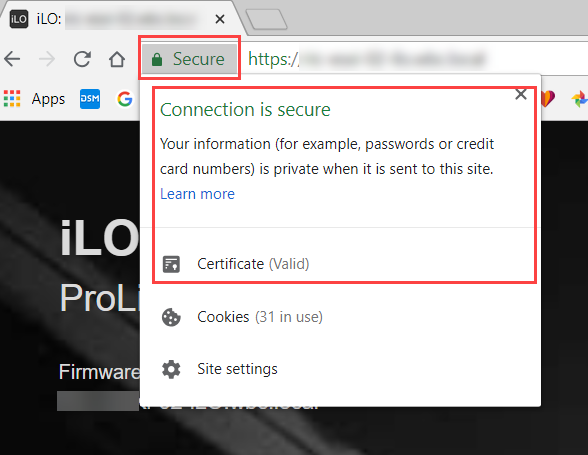
You can see that the certificate signed by the CA is now presented by the iLO:

Wrap Up
The process is very straightforward and can be completed entirely at a command line without having to login to the web interface. One thing I should advise. I tried using an wildcard certificate issued from the CA and applying it to the iLO but it didn’t like that. Seems you have to generate a CSR to get a working certificate. If I am wrong please let me know.
