
AutoLab 3.0
Introduction
AutoLab is an amazing tool that has been around for a few years now. I have used it for creating a nested VMware lab that has been used for VCP and VCAP study. v3.0 was recently release so I though it would be good to review the tool and detail a fix for an issue I recently had when building the lab.
AutoLab Overview
AutoLab has been about for over six years now and has been created by community member Alastair Cooke. I have used previous builds but this is the first release in a while. Improvements from previous versions include:
- Support for vSphere 5.0 up to 6.7
- Horizon View 5.0 to 7.5
- Support for Windows Server 2016
- FreeNAS version updated
- Router changed from FreeSCO to pfSense
AutoLab supports nesting on VMware Workstation, Player, Fusion, ESXi. There is also a Blueprint in Ravello that spins up the entire lab. I personally use Workstation on a Workstation with a 4 core Xeon and 64GB RAM and the performance is fine for a lab environment. Obviously you need lots of RAM. I would say 32GB is the minimum. A SSD is a must.
The lab has the following components:
- pfSense router for inbound and outbound access to the lab
- FreeNAS NAS VM that provides shared storage for the lab. It also acts as the repository for all the required ISOs and scripts
- Domain Controller
- Windows based vCenter. You can choose the OS and vCenter version deployed
- 4 ESXi hosts. You can choose the version deployed
- (Optional) vCloud Director
- (Optional) Horizon View
- (Optional) Veeam ONE
- (Optional) Veeam Backup & Replication
An impressive list of features. I can build the core components in about 2 hours and 30 minutes. There is an .ini file that lets you choose how much of the process is automated. For example you can choose to automatically install vCenter, build the datastores, set passwords, etc.
Documentation
This may seem like it could be complicated to setup, but it’s very straightforward. The download contains pre-built VMs that you simply have to extract and then import into our hypervisor of choice. Once extracted you perform the following steps:
- Boot the Router
- Boot the NAS and add in all the ISO software required such as Windows Server OS, the vCenter, ESXi, management tools etc.
- Edit the automation
.inifile to set the build options - Build the Domain Controller. This is fully automated. Verify the build using the PowerShell script on the desktop
- Build the ESXi hosts. Again this is automated. All you have to do is select which Host you are building in the boot menu
- Boot the vCenter VM. The level of build is determined in the automation
.ini. Verify install using PowerCLI/PowerShell script on the desktop
It’s pretty straightforward. The documentation that is included details the process well. Included is some additional sections for tuning the RAM consumption, rebuild process, IP information, credentials, etc. The pdf also adds in the steps to add in all the optional components such as View, Veeam, etc.
Windows Server OS Build Issue
I hit an issue when building the DC and vCenter VMs recently. I was using my TechNet (still miss TechNet) versions of the 2012 R2 ISO file which is a volume licensed copy. On boot the VMs were displaying:
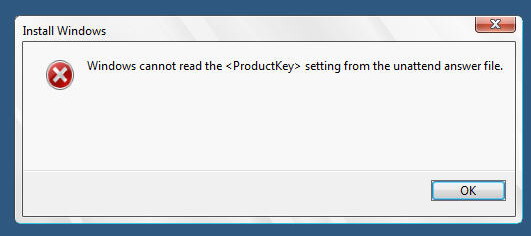
This was because the autounattend.xml file used was built assuming you would be using the evaluation copies of Windows.
To fix this was a multi-step process. This example is for the DC VM:
- Browse to the VM datastore file location for the VM and find the file called
DC-Config.iso - Extract the ISO to a directory
- Open the
autoUnattend.xmlfile in a text editor or Windows System Image Manager - You need to edit the
windowsPEsection and then theMicrosoft-Windows-International-Core-WinPEportion - In the
section change ` 2 ` to `Windows Server 2012 R2 SERVERSTANDARD ` - In the
<UserData>section add the<ProductKey>and<WillShowUI>entries - Use a utility such as Folder2ISO to create a new
DC-Config.isofile with the updatedautoUnattend.xmlfile - Boot the DC VM again and it should build properly
The new entries in autoUnattend.xml should look like this (obviously fill in your own Product Key)
            <ImageInstall>
                <OSImage>
                    <InstallTo>
                        <DiskID>0</DiskID>
                        <PartitionID>1</PartitionID>
                    </InstallTo>
                    <InstallFrom>
                        <MetaData wcm:action="add">
                            <Key>/IMAGE/INDEX</Key>
                            <Value>Windows Server 2012 R2 SERVERSTANDARD</Value>
                        </MetaData>
                    </InstallFrom>
                </OSImage>
            </ImageInstall>
            <UserData>
                <AcceptEula>true</AcceptEula>
                <FullName>Lab</FullName>
                <Organization>Lab.local</Organization>
            <ProductKey>
                <Key>XXXXX-XXXXX-XXXXX-XXXXX-XXXXX</Key>
                <WillShowUI>OnError</WillShowUI>
            </ProductKey>
            </UserData>
The same has to be done to the autoUnattend.xml in the ISO file called VM-Config.iso in the VC VM folder.
Wrap Up
As you can see AutoLab is a valuable tool available to the community. I highly recommend investigating it if you want a easily deployable, repeatable, and easy to use package to build your lab environment.
Go download it at http://www.labguides.com/autolab/.